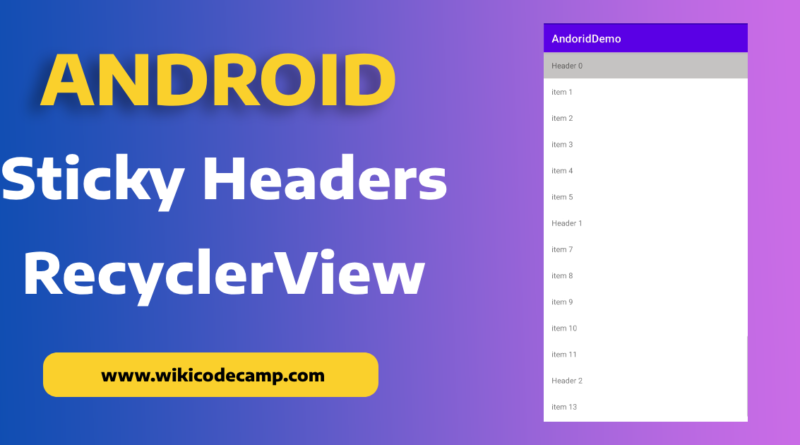
Sticky Headers RecyclerView Android
Sticky headers in mobile apps are navigation bars or headers that remain fixed at the top of the screen even when a user scrolls through content. They stay visible and easily accessible, providing constant access to important features, menus, or navigation options. This feature enhances user experience by allowing quick access to essential elements without the need to scroll back to the top of the page. Today we will learn how to create sticky headers recyclerview in android kotlin. Let’s start
Important Note: In this example we have used view binding.
Step 1: Add Sticky Headers dependency.
Open your module level build.gradle file and and add this StickyHeaders dependency in dependencies block.
implementation 'com.github.shuhart:stickyheader:1.1.0'Now sync the project.
Step 2: Create data class
Now create a data class. We will use this class to provide data to recyclerview adapter.
class Item(var name: String)Step 3: Create recyclerview in layout file
Open your activity_main.xml file and create a recyclerview it it.
<?xml version="1.0" encoding="utf-8"?>
<LinearLayout xmlns:android="http://schemas.android.com/apk/res/android"
    xmlns:tools="http://schemas.android.com/tools"
    android:layout_width="match_parent"
    android:layout_height="match_parent"
    tools:context=".MainActivity">

    <androidx.recyclerview.widget.RecyclerView
        android:id="@+id/recycler_view"
        android:layout_width="match_parent"
        android:layout_height="match_parent" />

</LinearLayout>
Step 4: Create header layout
Create a new layout file for sticky headers in recyclerview. Create a TextView in this file.
<?xml version="1.0" encoding="utf-8"?>
<LinearLayout xmlns:android="http://schemas.android.com/apk/res/android"
    android:layout_width="match_parent"
    android:padding="16dp"
    android:background="#C6C3C3"
    android:layout_height="wrap_content">

    <TextView
        android:id="@+id/tv_header"
        android:layout_width="match_parent"
        android:layout_height="wrap_content"  />
</LinearLayout>
Step 5 : Create item layout
Create a new layout file for item in recyclerview. Create a TextView in this file
<?xml version="1.0" encoding="utf-8"?>
<LinearLayout xmlns:android="http://schemas.android.com/apk/res/android"
    android:layout_width="match_parent"
    android:padding="16dp"
    android:layout_height="wrap_content">

    <TextView
        android:id="@+id/tv_item_name"
        android:layout_width="match_parent"
        android:layout_height="wrap_content"  />
</LinearLayout>
Step 6 : Create an adapter for sticky headers recyclerview
Now we will create an adapter for recyclerview. This adapter class should be extended with StickyAdapter class for sticky headers.
class ItemsListAdapter(val context: Context, val items: List<Item>) :
    StickyAdapter<ItemsListAdapter.SectionHolder, ItemsListAdapter.ItemsListHolder>() {

    class ItemsListHolder(val binding: ItemLayoutBinding) : RecyclerView.ViewHolder(binding.root) {

    }

    class SectionHolder(val binding: HeaderLayoutBinding) : RecyclerView.ViewHolder(binding.root) {

    }

    override fun onCreateViewHolder(parent: ViewGroup, viewType: Int): ItemsListHolder {
        val binding = ItemLayoutBinding.inflate(LayoutInflater.from(context), parent, false)
        return ItemsListHolder(binding)
    }

    override fun onBindViewHolder(holder: ItemsListHolder, position: Int) {
        val item = items[position]
        holder.binding.tvItemName.text = item.name
    }

    override fun getItemCount(): Int {
        return items.size
    }

    override fun getHeaderPositionForItem(itemPosition: Int): Int {
        return   itemPosition-(itemPosition%6)
    }

    override fun onBindHeaderViewHolder(holder: SectionHolder, headerPosition: Int) {
        val item = items[headerPosition]
        holder.binding.tvHeader.text = item.name
    }

    override fun onCreateHeaderViewHolder(parent: ViewGroup?): SectionHolder {
        val binding = HeaderLayoutBinding.inflate(LayoutInflater.from(context), parent, false)
        return SectionHolder(binding)
    }
}
Here we have used the view binding.
We created two ViewHolder classes, one for the item and one for header. Similarly there are two onCreateViewHOlder methods, one for item and one for header.
Another thing needs to be noted here
    override fun getHeaderPositionForItem(itemPosition: Int): Int {
        return   itemPosition-(itemPosition%6)
    }
This function is from StickyHeader class, and its return type is integer, We will return the position of the header, We will return the header position for the item based on its position.
Step 7: Populate Sticky Header RecyclerView
This is our final step. Open MainActivity class and set adapter for sticky header recylcerview.
class MainActivity : AppCompatActivity() {
    lateinit var binding: ActivityMainBinding
    val context = this@MainActivity
    override fun onCreate(savedInstanceState: Bundle?) {
        super.onCreate(savedInstanceState)
        binding = ActivityMainBinding.inflate(layoutInflater)
        setContentView(binding.root)
        initViews()
    }

    fun initViews() {
        val layoutManager = LinearLayoutManager(context)
        binding.recyclerView.layoutManager = layoutManager

        var list = ArrayList<Item>()

        for (i in 0..120) {
            if (i % 6 == 0)
                list.add(Item("Header " + i / 6))
            else
                list.add(Item("item $i"))

        }
        val adapter = ItemsListAdapter(context, list)
        val decorator = StickyHeaderItemDecorator(adapter)
        decorator.attachToRecyclerView(binding.recyclerView)
        binding.recyclerView.adapter = adapter
    }
}
Here we add items in the list and pass this item list into the adapter. And adapter displayed these items in recylerview according to its type and position.