How to use Radio button in Flutter
Radio button is a widget that is used to take input from user. It allows user to select only one option from predefined multiple options. We can group radio buttons in two of multiple. User can select only one option form them. In this tutorial we will learn how to use Radio button in Flutter and how to customise radio buttons.
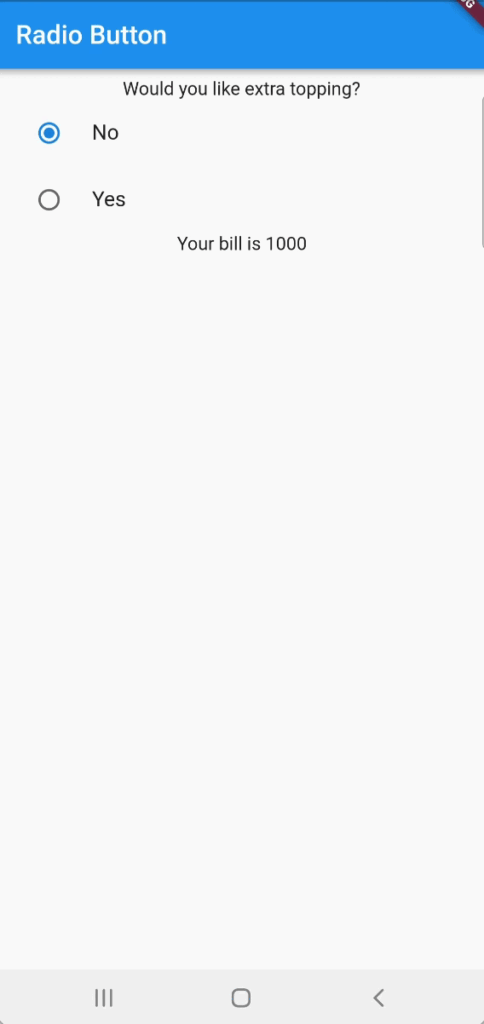
Radio button is basically a bordered circle with white hole. It contains the Boolean value. It also shows a label with it that denotes its choice. User can read this label and will take decision about his choice. We can show multiple choices as radio buttons to user, but when user will select one radio button, that button will be filled with color, and all other button will remain empty. This color change denotes that this choice is selected.
Simple examples of use of Radio buttons are, when we want to ask gender form user, we just show two options to user (Male, Female). User has to select only one choice form them. He can only choose male or female, not both. Similarly if we want to ask color form user and we shows 5 colors to him. He will select only one color of them.
Let’s do an example of Radio button in Flutter
What we are going to achieve?
Here we will do an example of radio button. Let’s suppose that we have a food app. Our customer is on our app and selects a Pizza to buy. Now we will ask him for extra topping. We will give him two options (No or Yes). If he chooses yes, then his bill will be 1200. And if he chooses NO then his bill will be 1000.

Let’s do it.
import 'package:flutter/material.dart';

void main() {
  runApp(const MyApp());
}

class MyApp extends StatelessWidget {
  const MyApp({Key? key}) : super(key: key);

  // This widget is the root of your application.
  @override
  Widget build(BuildContext context) {
    return MaterialApp(
      title: 'Tutorial',
      theme: ThemeData(
        primarySwatch: Colors.blue,
      ),
      home: const MyHomePage(),
    );
  }
}

enum ExtraTopping { yes, no }

class MyHomePage extends StatefulWidget {
  const MyHomePage({Key? key}) : super(key: key);

  @override
  State<MyHomePage> createState() => _MyHomePageState();
}

class _MyHomePageState extends State<MyHomePage> {
  TextEditingController dateInputController = TextEditingController();
  var selectedValue = ExtraTopping.no;

  @override
  Widget build(BuildContext context) {
    return Scaffold(
      appBar: AppBar(
        title: const Text('Radio Button'),
      ),
      body: Center(
          child: Padding(
        padding: const EdgeInsets.all(8.0),
        child: ListView(
          children: [
            const Center(child: Text('Would you like extra topping?')),
            RadioListTile<ExtraTopping>(
                title: const Text('No'),
                value: ExtraTopping.no,
                groupValue: selectedValue,
                onChanged: (value) {
                  setState(() {
                    selectedValue = value!;
                  });
                }),
            RadioListTile<ExtraTopping>(
                title: const Text('Yes'),
                value: ExtraTopping.yes,
                groupValue: selectedValue,
                onChanged: (value) {
                  setState(() {
                    selectedValue = value!;
                  });
                }),
            Center(child: Text(selectedValue == ExtraTopping.yes ? 'Your bill is 1200 ' : 'Your bill is 1000'))
          ],
        ),
      )),
    );
  }
}
Conclusion
Here we just do a simple example of Radio button in Flutter. We ask user for extra topping on his Pizza and manage bill on the base of his decision. Hope you will be able to use Radio buttons in your Flutter projects after reading this. Thank you for reading.


